


|
Vertical Blind Installation Instructions CONGRATULATIONS on purchasing the finest vertical blinds made. We are confident that you will be pleased with there ease of installation, function, fashion and quality. Please read completely the instructions below before beginning the installation process. Before beginning installation, remove all the parts from box and check the parts list to make sure you have received all parts needed for installation. Double check the carton for parts before discarding it. To install your new vertical blind you will need the following tools:
| |||||||||||||||
|
SUGGESTED FASTENER GUIDE Anchors* (Not Supplied) Plastic or lead anchor insert.(Plastic anchor insert for light weight blinds on drywall, paneling etc. |
| ||||||||||||||
|
Hollow Wall Anchors* (Not Supplied) Hollow wall anchor or hollow wall toggle bolt are used for heavy blinds. |
| ||||||||||||||
PARTS LIST
NOTE: You will receive only one of the styles shown here (For corded blinds only) Valance Parts | |||||||||||||||
|
 | ||||||||||||||
|
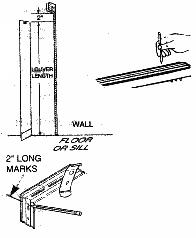
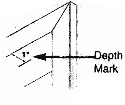
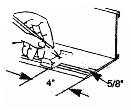
There are two basic vertical instructions. A. One way is to mount it to a vertical surface such as your wall, outer window frame or outer door frame. (OUTSIDE MOUNT) B. The second way is to mount it to a horizontal surface such as your ceiling or to the upper surface of your window frame or door frame. (INSIDE MOUNT) A. Outside Mount Mounted on a vertical Surface (Wall, Window or Door Frame)
| |||||||||||||||
|
|
 | ||||||||||||||
 | |||||||||||||||
|
|
 | ||||||||||||||
|
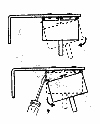
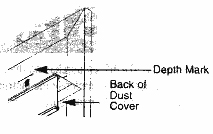
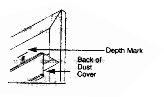
B. INSIDE MOUNT MOUNTED ON HORIZONTAL SURFACE (CEILING OR UPPER INSIDE DOOR/WINDOW FRAME) Note: This mounting method can be used for dust cover valance. For Trimline see section E, For Horizon see section F.
 | |||||||||||||||
|
|
 | ||||||||||||||
 | |||||||||||||||
|
|  | ||||||||||||||
|
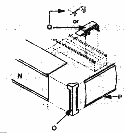
To remove blind, release headrail by inserting a screwdriver between headrail and release tab. 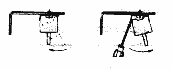 C. DUST COVER VALANCE
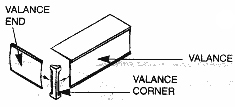
VALANCE CORNER ASSEMBLY
 | |||||||||||||||
|
|
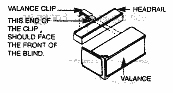 | ||||||||||||||
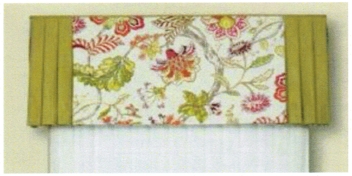
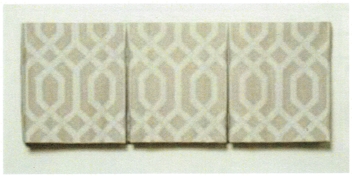
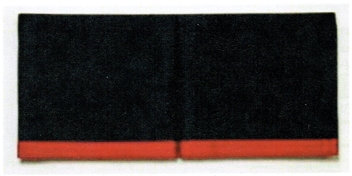
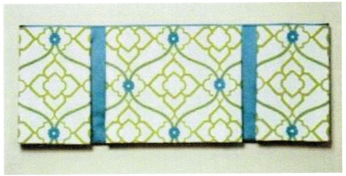
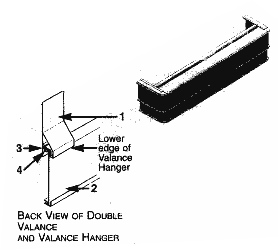
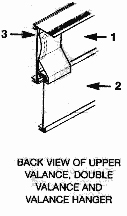
D. LASERLITE EXECUTIVE VALANCE INSTALLATION INSTRUCTIONS SINGLE VALANCE: OUTSIDE MOUNT Snap valance clips(1) onto headrail(2) about 2" from each end. Space remaining clips evenly onto headrail. Slide valance onto clips. Note:For clips with notches on its tab, break the tab along notch so that the valance will fit better on window. 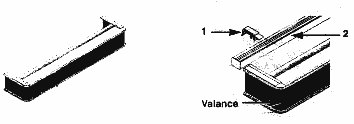 DOUBLE VALANCE: OUTSIDE MOUNT
| |||||||||||||||
|
|
 | ||||||||||||||
 | |||||||||||||||
|
|
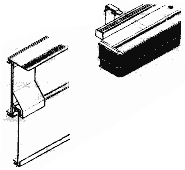 | ||||||||||||||
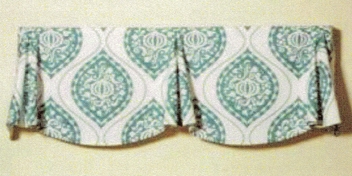
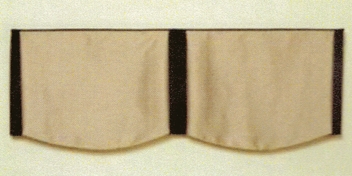
INSIDE MOUNT MOUNTED ON HORIZONTAL SURFACE (CEILING, UPPER INSIDE DOOR OR WINDOW FRAME) SINGLE VALANCE ONLY
 | |||||||||||||||
|
|
 | ||||||||||||||
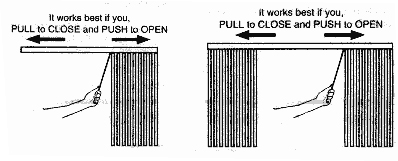
 E. WAND CONTROL OPERATING INSTRUCTIONS: TO ROTATE the louvers, rotate the wand in the direction you want the louvers rotated. TO OPEN OR CLOSE THE LOUVERS, first rotate the louvers open. Then, push or pull the wand to open (stack louvers) or close (unstack louvers) the blind. If louvers are installed with the front of the louver facing the wand, the wand will be in front of the louvers when the blind is rotated closed. If the louvers are installed with the back of the louver facing the wand, the wand will be in back of the louvers when the blind is rotated closed. | |||||||||||||||
 | |||||||||||||||
F.TENSION PULLEY (STANDARD) To avoid Strangulation, A Cord Weight or Cord Tension Pulley should be attached to the cord and then secured to the wall. Two pull tassels should be attached to the chain. | |||||||||||||||
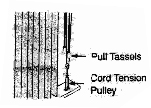 | |||||||||||||||
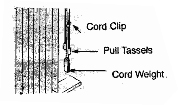
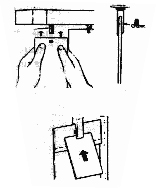
INSTALL CORD TENSION PULLEY Note: Do Not Pre-Drill Holes For inside mounts, pulley should be positioned toward back of sill so that it will not interfere with the louver rotation. CORD WEIGHT AND CORD CLIP WITH EZ OPEN OPTION (OPTIONAL) | |||||||||||||||
|
 | ||||||||||||||
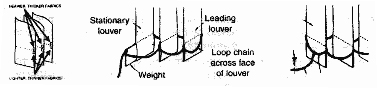
G. LOUVER INSTALLATION (ALL STYLES)
 For Fabric Louvers With Standard Weights: If weights are not sewn into pockets, insert weights in pockets at the bottom of the louvers. Attach clips to front holes of weights starting with the louver at the stationary end of the blind. At the leading louver, drape chain across face of louver and attach clips to back holes of weights. Thread loose end of chain through one loop on the tie down clip. Join chain ends using chain connector. Attach clip to window casing or floor with screw. | |||||||||||||||
 | |||||||||||||||
For PVC Louvers With Keyholes Located at the center of the Louver: Keep spacing with spacer card. Attach tie down clip to the end of bead chain. Screw clip to the floor. H. ANGLE BLINDS | |||||||||||||||
| To allow the louvers to hang and rotate a special stem has been provided. Hold the stem steady while inserting the louver. |
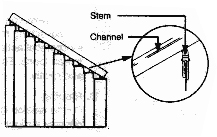 | ||||||||||||||
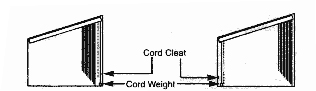
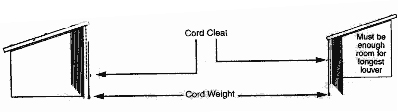
| Follow Headrail Mounting Instructions Section A. or B. Follow Louver Installation Section G. Follow Valance Installation Instructions Section C,D. A Cord weight and cord cleat should be attached to blind instead of tension pulley and cord clip. Since the blind is mounted at an angle, the louver holders will tend to slide "downhill". A cord cleat is provided to wrap the cord around and prevent the louvers from sliding.  A cord weight will apply constant tension to the cord. install the cord cleat securely at a height to allow several turns of cord to be wrapped around it.(At least 18" above the cord weight) INSTALLATION OPTIONS: | |||||||||||||||
| |||||||||||||||
|
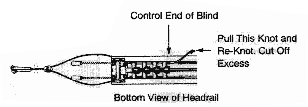
I. SHORTEN CORD/REMOVE CORD TWIST | |||||||||||||||
| If the cord is too long you may adjust it. Traverse louver holders to stacked position. Grasp knot located along the inside of the track and pull out excess cord. Re-knot and cut off excess. |
 | ||||||||||||||
Un-Twisting Pull Cords After you mount your blind, your cords may be twisted together. Follow these instructions to untwist them. Open blind all the way. Pull out the knot that is farthest away from the end with the cords and chain. Use needle nose pliers, if you have one, to get at the knot. Hold the cord near the knot and the cord near the drive end and twist both of them in the same direction. Try twisting one way and then the other until you find the right way to untwist the cord. Pull the cords on the end of the blind to get the knot back inside the blind. 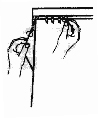 J. MAINTENANCE LOUVER MAINTENANCE CLOTH- Clean by vacuuming VINYL (PVC) Clean with damp cloth and mild soap. A thin film of mild soap left on the louvers helps keep static electricity from building up. If Cleaning becomes necessary, it is recommended to use a mild non-abrasive household detergent such as 409 or Ivory dish washing liquid to wipe dust build-up from the louvers. LOUVER MAINTENANCE If closing or opening the blind becomes difficult, it is recommended to spray a small amount of silicon along the aluminum rod inside the headrail. Operate the blind a couple of times to be sure that the whole rod has been lubricated. Vacuum the headrail periodically to prevent dust accumulation. Headrail Maintenance is recommended every 2 years. NON-WOVEN TEXTILE MATERIAL: Several Conditions are inherent in the construction of this unique non-woven textile material:
|
|||||||||||||||
Store Hours
Showroom : 3140-14 Ave , NE
( Unit 12) Calgary, Alberta, Postal code:T2A 6J4"Click here for directions

| Monday to Sunday - Appointment Only |
( Unit 12) Calgary, Alberta, Postal code:T2A 6J4"Click here for directions


Blinds
Shades
- Cellular Shades
- Zebra (Latest)
- Combi Roll(Latest)
- Double View Roller
- Shangri-La(Latest)
- Sheer Horizontals
- Solar Roller Shades
- Designer & Blackout Roller
- Sliding Panels
- Sheer Verticals
- Cellular Verticals
- Vertical Sheer
Specialty Products
GET A QUICK QUOTE
Top