


|
CELLULAR SHADES INSTALLATION Lift Installation Instructions Please note that the lift mechanism should not be operated prior to the shade's installation. Before proceeding with installation, please note that the proper shade support, clips and brackets should not be mounted more than 48" apart. Outer supports should be approximately two inches from the end of the headrail. Please use wood screws or appropriate fasteners for other surfaces. Position the shade at the window to determine the location of the supports. Then follow the installation procedure specific to the shade support system enclosed with your shade and the type of mounting requried. | |||||||||||
|
Basics A few simple tools are required:
| |||||||||||
|
Additional fasteners other than those sent with your shade may be required depending on the mounting surface. Wallboard and plaster require the use of anchors such as expansion or toggle bolts. Brick, tile or stone need special plugs and drill bits. Remember to always pre-drill holes in wood to avoid splitting | |||||||||||
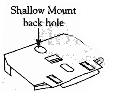
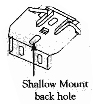
| Bulge Head or Dry Wall Screw only for shallow mount back holes | Hex Head Screw for any other hole | ||||||||||
|
Hold Down bracket (Optional) | Extension Bracket (Optional) | ||||||||||
 | |||||||||||
|
Double Honeycomb Cellular shades are constructed as either an Inside Mount or an Outside Mount. The Installation Bracket can be mounted inside the window opening, for an inside mount, or on the molding or wall above the window for an outside mount. The Extension Brackets an the Hold Down Brackets are optional items requested at the time of ordering the shade. The Extension Brackets provides projection of the Installation Bracket in order to clear obstructions. The Hold Down Bracket keeps the shade from swaying and is often used for installation on door windows. | |||||||||||
 |  | ||||||||||
|
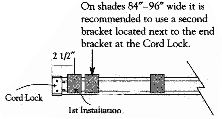
Bracket Installation Shades are shipped with the required number of brackets for proper installation. End brackets should be located with centerlines 21/2" in form each end. Depending on the width of the shade, additional brackets may be necessary evenly spaced between the two end brackets. | |||||||||||
| |||||||||||
|
Using the Installation Bracket as a template, measure and mark the center lines. When mounting brackets, make sure they are all in line and level. | |||||||||||
 | |||||||||||
|
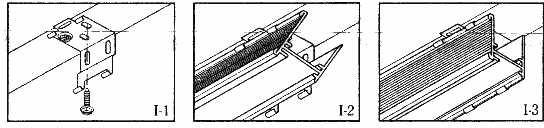
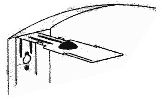
Inside Mount The brackets are mounted flat against the top sill surface. To fully recess the shade requires a flat surface with a minimum depth of 13/4". Shallow mounting requires 1/2" Minimum. | 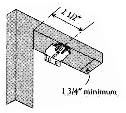 | ||||||||||
| Inside or Ceiling Mount Place screws through top of bracket and secure to casting or ceiling (I-1) Attach shade to brackets by placing front edge of headrail into the front bracket lip (I-2) Push back of headrail up into the back of the bracket lip until the headrail snaps securely into place (I-3) | |||||||||||
 | |||||||||||
|
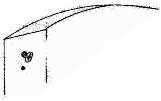
Outside Mount The brackets are mounted with the back end of the bracket flat against the window molding or wall above the window. The bracket requires a minimum surface 3/4" high. | 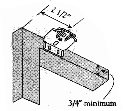 | ||||||||||
| Outside or Wall Mount Place screws through top of bracket and secure to wall or frame (J-1) Attach shade to brackets by placing front edge of headrail into the front bracket lip (J-2) Push back of headrail up into the back of the bracket lip until the headrail snaps securely into place (J-3) | |||||||||||
 | |||||||||||
|
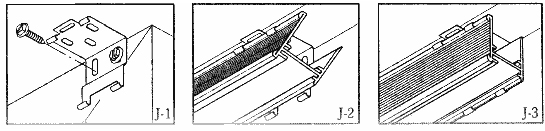
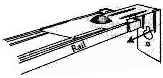
Extension Brackets (Optional) Optional Extension Brackets are used to project the back of the shade up to 2/38" from the mounting surface. Attach the installation bracket to the extension bracket with the nut and blot provided |  | ||||||||||
| Projection Mount Attach angular supports to wall or frame. Two supports are needed for each bracket (K-1) Attach the bracket, placing screws through the top of the bracket and through the angular support (K-2) Attach shade to bracket by placing front edge of the headrail into front bracket lip (K-3) Push back of headrail up into the back of the bracket until the headrail snaps securely into place (K-4) | |||||||||||
 | |||||||||||
Side Mount Bracket
   | |||||||||||
|
Hanging the shade Unwind the cord from the shade but keep the rubber band around the stack.
To remove shade, reverse procedure. | |||||||||||
 | |||||||||||
|
Hold Down Bracket (Optional) Optional Hold Down Brackets are mounted with the supplied screws. With the shade at its proper drop, place the pin of each Hold Down into the hole in each End Cap and mark the screw holes. Make sure the pins are level and aligned. Raise the shade, Then screw the Hold Down Bracket into the mounting surface. | |||||||||||
 | |||||||||||
|
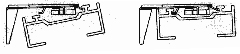
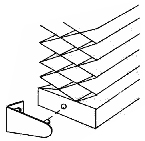
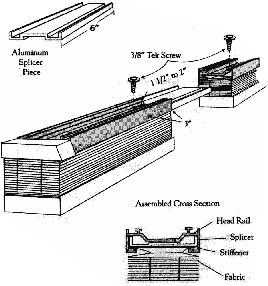
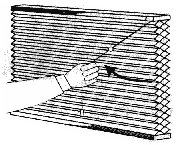
Two On One Headrail Splicer For shades ordered as Two-On-One Headrail using the splicer piece, insert splicer in headrail of both shades as shown. Lock into place using 3/8" Tek Screws provided. | |||||||||||
 | |||||||||||
|
Cordlock Operation To raise or lock shade, pull the cord down and inward toward the center of the shade. To lower or release the shade, pull the cord downward in the vertical position to release the lock. | |||||||||||
 | |||||||||||
|
Protect Your Children Be aware that it is possible for children to strangle window covering cords. To reduce the occurrence of accident, all cords must be kept out of reach of children, including infants. Cord cleats are an effective way to implement this essential precaution. | 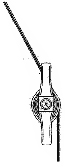 | ||||||||||
|
Mount the cord cleat at a safe height, taking into account furniture or other objects upon which a child may climb. Then after each use of the shade, simply wrap the excess cord around the cleat. It's fast easy and safe. Cleaning and Care The Shade fabric is easy to care for. Regular dusting with a feather duster or vacuum cleaner brush is recommended. Most stains can be blotted with a damp sponge and a mild detergent. For problem stains, the shade can be removed from the installation brackets and soaked in warm water. When damp, raise shade tightly to crisp pleats. Before using anything stronger than mild detergent and lukewarm water, test an obstructive corner of the shade. If you have any questions , call dealer for advice |
|||||||||||
Store Hours
Showroom : 3140-14 Ave , NE
( Unit 12) Calgary, Alberta, Postal code:T2A 6J4"Click here for directions

| Monday to Sunday - Appointment Only |
( Unit 12) Calgary, Alberta, Postal code:T2A 6J4"Click here for directions


Blinds
Shades
- Cellular Shades
- Zebra (Latest)
- Combi Roll(Latest)
- Double View Roller
- Shangri-La(Latest)
- Sheer Horizontals
- Solar Roller Shades
- Designer & Blackout Roller
- Sliding Panels
- Sheer Verticals
- Cellular Verticals
- Vertical Sheer
Specialty Products
GET A QUICK QUOTE
Top