


|
This blind has had the motor installed at the factory. Please follow these instructions to complete the installation. 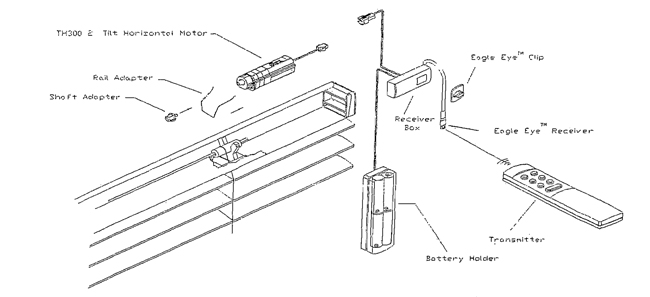 I. Installing the Eagle Eye receiver and battery holder:
Note: The receiver includes both a white box and a remote Eagle Eye located on an 10" cable from the box. This eye must be in direct line of sight to the remote control. 1. Plug the white receiver box to the motor. Store any excess cable in the rail or as appropriate. 2. There is approximately 10" of wire from the receiver box to the motor. (If more wire is necessary, consult your supplier for receiver extension cables available in 19" and 59") Position the receiver box anywhere desired. • Recommendations - behind the headrail; behind the valance... • Before removing the double-sided tape and mounting the receiver box in the desired location, clean the area with rubbing alcohol to ensure a more secure placement. 3. Position the Eagle Eye so that the eye is visible to the remote control. Use the Eagle Eye clip provided to affix the cable to secure the position of the Eagle Eye. Once again, the clip is installed using double-sided tape and the area must be clean. • Recommendations - over the top of the rail, behind the valance; etc. • Prevent direct sunlight or lamp light from falling on the Eagle Eye receiver. 4. Locate the battery holder in any position desired up to 59" from the receiver box. • Recommendations - screwed or taped to the wall; under the window's sill; behind a top or side treatment.... • The clear plastic battery holder may be installed as is with screw; or the double-sided tape provided. If using the double-sided tape, ensure the area is cleaned using rubbing alcohol. If desired, the white battery holder cover can be snapped onto the battery holder. 5. Insert four AA batteries in the battery holder. Use alkaline batteries only. 6. Snap the battery connector from the receiver to the battery holder. Store the excess wire in the battery holder case or in the rail. (The battery holder comes standard with 59" of wire. There are no extension cables available.) Note: Install the blind per the enclosed directions. The blind should still be in the raised and locked position. Make sure the blind is well aligned and installed with all brackets. Install the valance and Eagle Eye to the valance, if desired lower the blind. If necessary, you can position the Eagle Eye at this time and proceed though steps 2-6. During installation, make sure the automated blind is well-aligned and installed without any stress to effect the torque for tilting. II. Programming the receiver to the remote control: 1. Overview of your remote control: Using your remote control, you can: • Operate three blinds individually. • Operate an unlimited number of blinds by grouping them into one of three channels. The three programmable channels allow you to operate up to three groups of one or more blinds. • Operate all your blinds simultaneously with the select all channel (channel 4). Operation: • You can use channels 1,2, or 3 to tilt the blind(s). The tilting movement of the blinds will either stop when the key is released or when the blind can be tilted no further. • The last channel (4) always operates all of the blinds and does not require any programming. 2. Programming the remote control's channel to the receiver: Install two AAA batteries in the remote control. Use alkaline batteries only. Be sure to program each blind immediately following the installation of each automation system. Once the batteries are installed in the battery holder, the blind is ready to be programmed. IMPORTANT: Because the remote control signal is so strong, if you attempt to program a number of blinds on individual channels at one time, the blinds will only program to one channel. To avoid this situation, only connect the batteries to the blinds to be programmed to the first signal, then connect the batteries to the blinds for the second signal, etc. The first channel you press (1,2 or 3) is the channel you have assigned to operate that blind. Once you have assigned the receiver's channel, the blind is automatically programmed to operate from that channel only and will not respond to other channels except channel 4 which operates all blinds. Several blinds can be programmed to operate from the same channel, for example, all blinds on one side of a room can be assigned the same channel. Note: If you decide to re-program a blind to a different channel, this can be accomplished by removing the batteries from the receiver battery holder for five minutes, then re-installing the batteries and reprogramming the blind. Reprogramming is required when replacing the battery holder batteries. III. Troubleshooting: If your motorized blind does not operate • If your remote control does not operate, check whether the blind is programmed to respond to the channel you pressed. Also, check for correct battery installation. If necessary, replace the remote control batteries. • If a blind does not operate, check for correct battery installation of the batteries in the battery holder, wire connections, or reprogram as described in section VI. If necessary, replace battery holder batteries. • Check that the shaft adapter is inserted tightly onto the tilt shaft. • Check that there is no direct light on the Eagle Eye receiver. If your blind still fails to operate, contact Customer Service at Updating |
Store Hours
Showroom : 3140-14 Ave , NE
( Unit 12) Calgary, Alberta, Postal code:T2A 6J4"Click here for directions

| Monday to Sunday - Appointment Only |
( Unit 12) Calgary, Alberta, Postal code:T2A 6J4"Click here for directions


Blinds
Shades
- Cellular Shades
- Zebra (Latest)
- Combi Roll(Latest)
- Double View Roller
- Shangri-La(Latest)
- Sheer Horizontals
- Solar Roller Shades
- Designer & Blackout Roller
- Sliding Panels
- Sheer Verticals
- Cellular Verticals
- Vertical Sheer
Specialty Products
GET A QUICK QUOTE
Top